Caterpillar Duo Cone Seal Installation Tool
Contact CAT and they can give you the dimensions for the toric seat. The diameter, angle and surface finish are extremely critical.
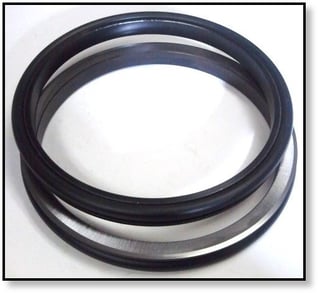
Have installed new duo cone seals in board of the sprocket as well as out. Instructions there is mention of a special tool Seal Installer IS8966.
Caterpillar Precision Seals 517 Industrial Park Rd Franklin NC 28734 You can find their website and phone contact info. Also review the material of the faces. The stamped steel rings have limited life so you can upgrade to Stellite or C-6 material. Toric material can also have an effect. Installation techique is important. Make sure everythins is CLEAN. Use their seating tool, the proper lubricant and make sure everything is CLEAN (yes, it is important).
Lube the seal faces with pure moly (no fillers) or a light synthetic oil just prior to assembly. Make certain there is adequate lubrication inside the seal cavity (assuming you're sealing something out) and verify that the GAP between the seal holders is correct for the application and rotating speed. Also be certain your shaft axial motion is within the limits of the seal. Hope this helps. 'If A equals success, then the formula is: A = X + Y + Z, X is work.
Z is keep your mouth shut.' -- by Albert Einstein RE: Duo-Cone Seal installation (Mechanical) 24 Jan 06 10:02. I agree with Sprintcar, i've also faced the same problem as you getting now, so, i went back to proper procedures installing the parts. There are too many important steps was always skipped by user that i found, the most important things is the 'clearance' between the seal housing and the seal ring which can ensure your seal sitting in the right position and it fixed. For your 9W6692 (before this the number is 9G9532 maybe), the minimum clearence (if refer to the handout in the seal box) is about 0.04' or almost 1mm.
This things always missed. By logic, it was the seating tools thickness.
I advice you to refer back to instruction given in the box. Sure it'll not miss again!!
Methord 1: 1. Using specialized tools installation: The pressure will apply to the O-ring directly. As shown, the special tool is mounted between the metal floating ring and the rubber ring, toward the seat hole, the rubber ring is evenly pressed into the hole. Other installation methods: One auxiliary O-ring is fixed between the conical ring surface of the floating oil seal and sealing O-ring (as shown). The ring of the floating oil seal is applied uniformly by pressure and the auxiliary O-ring braces the sealing O-ring to ensure the other correct mounting positions. Methord 3: Methord 4: 1, Now prepare the floating seal for install. Always work with seal on a clean cloth and keep work equipment and area as clean and dirt/dust free as possible.
2, Find some automotive type insulated wire that will fit snug in the groove between the toric ring and the underside of the seal ring face. I happened to find some 12 GA insulated wire that worked perfect. Cp dp. It can't be a loose fit or it will allow the toric ring to walk up the ramp of the seal ring, and it can't be too tight or it will push the toric off of the seal ring, you just need a good snug fit.
3, Work the wire around the circumference of the seal, just be careful with your fingers around the steel seal surface. Although the edge of the seal ring isn't sharp as a knife, it's plenty sharp enough to put a nasty cut on a fingertip. 4,Then join some zip ties together and gently zip them down centered on the wire to hold wire in place. You don't have to pull them excessively tight, just snug enough to hold wire in the groove. 5, Although it's recommended to install the seal dry, no oil or grease on the surfaces, installing the seal dry creates a lot of friction working against you. I typically use spray silicone lubricant as it leaves a dry lubricating film. Others use lubricants such as WD-40 as it's a thin film lube that evaporates the liquid as well, and even dry talcum powder will do the trick.
Flip the seal ring over so the toric ring is on top, spray the toric ring and the housing ring that the seal fits into with the spray silicone. 6, Place the seal squarely on the housing, use gentle even pushing pressure, pushing seal straight into the housing.
After enough pressure is applied it will pop in place. Carta responsiva compra venta automovil pdf to doc. 7, Once seal has popped in, remove the zip ties and the electrical wire.
8, Keep in mind we're doing this by hand, chances are when toric ring popped in that the seal isn't perfectly aligned with the housing. Note on the right that the seal is in a bit farther than the left side of pic. We can work with a little misalignment, but if it's way off, pull seal out and repeat process.